How To Measure A Room
All great kitchen designs start with accurate room measurements.
Measuring a room is a relatively straightforward process that can be completed by anyone. You don’t need to be a joiner or kitchen fitter, however, we do recommend a second pair of hands to hold the end of the tape measure and to help record the room measurements.
In this guide, we will show you how to measure up a room for a new kitchen so you can provide our designer with accurate measurements on which to base your design.
Note
It is very unlikely that any of the corners in your room are going to be perfect 90-degree angles or that any of your walls are going to be perfectly plumb (from top to bottom). So never assume that opposite walls are going to be the same length or that the ceiling height is consistent across the entire room, as this is rarely the case. It is important to be accurate and thorough with your measurements, which is why we request that you provide detailed measurements of the room and each wall.
Useful Tip
When measuring the room its useful to pretend that it is completely empty of all furniture, including your existing kitchen, and that it’s ready for the new kitchen to be installed.
What You’ll Need
- A tape measure (ideally 8 meters long)
- Printouts of our Room Measurement Grid is recommended (click to download). Whilst you could use some A4 graph paper or some blank A4 paper we recommend you use our Room Measurement Grid.
- A pencil and rubber (this makes corrections easier!)
- A ruler
- A smartphone or tablet with a camera. Whilst not essential, if you also have use of a scanner you can use this to scan your paper plans.
Ready? So let’s start measuring.
Step 1 – Create A Room Outline Plan
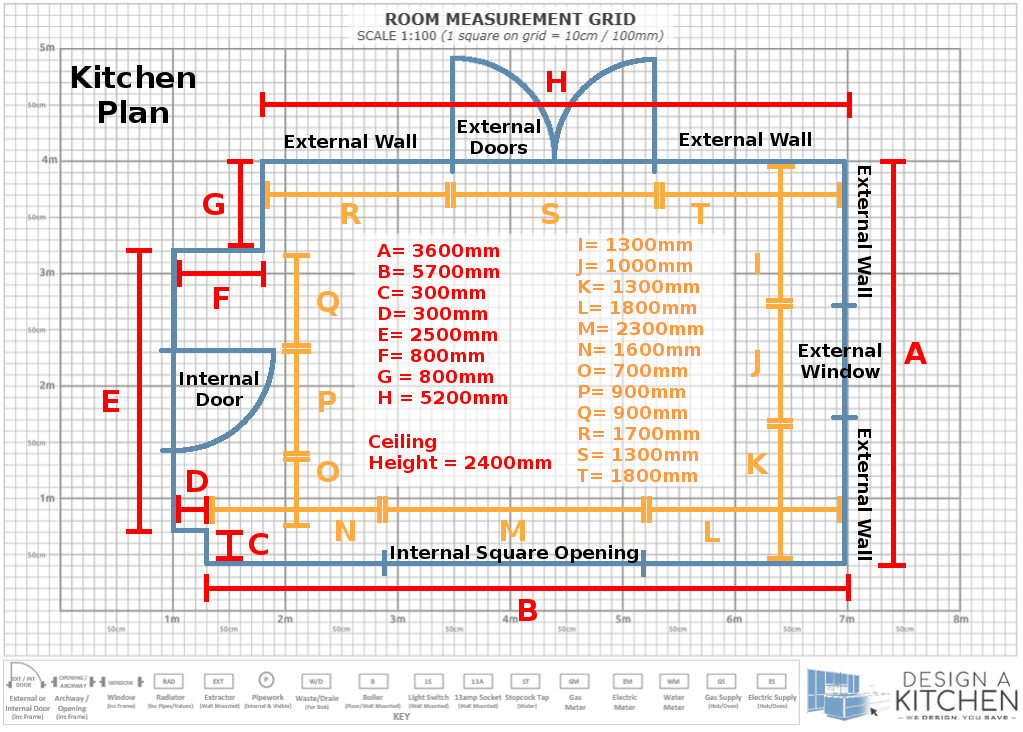
Start by writing a title on the paper plan to denote the room, for example, ‘Kitchen Plan’ or ‘Utility Plan’.
Pick a corner of the room to start from and measure all the walls horizontally, working your way around the room until you are back where you started. Ignore windows, doors, archways and wall openings for the moment.
Using these measurements, transfer the outline of the room onto the paper plan and label each wall as you go, using a unique letter (as shown).
Create a ‘key’ on the paper plan that records the wall measurements (in millimetres) against each wall label.
Now measure the ceiling height at the centre of the room and write that on the paper plan.
Note
If you are structurally altering the room (i.e. extending or combining multiple rooms) then we recommend that you confirm the accuracy of your measurements with your architect.
Useful Tip
We recommend that you draw your room to scale, as this provides a built in accuracy check against your measurements, especially when joining the room outline together. Our Room Measurement Grid makes this easy and provides a 1:100 scale (so each square is 100mm or 10cm). If you need to alter the scale to fit your room onto the paper plan please update the scale labels on the plan accordingly.
Step 2 – Add Openings, External Walls & Door Hinging
Starting at the same corner, go around the room again and measure the width of each window, door, archway and wall opening, include in this measurement any frame or architrave surround.
Then measure the distance between each opening and the corners of the room. This time measure up to but do not include any frame or architrave surround.
Update the paper plan to accurately position each window, door, archway and wall opening on each wall. Add a unique label for each measurement taken onto the paper plan then extend the ‘key’ to record the label and the associated measurement (in millimetres). Finally identify on the plan which walls, and doors are external and for each door the way they open, as per the example picture.
Note
If a wall is highlighted as being external our designer will assume that there is no obstacle on or close to that wall that would restrict the venting of extractor hoods, external pipework, etc. If this is not the case, please state this on the paper plan.
Step 3 – Create Wall Outline Plans
Having drawn the room plan it is now time to create individual wall outline plans for any wall that has any of the following:
(1) a door, window, archway or wall opening,
(2) ceiling height that differs from the one recorded on the room outline plan, or
(3) at least one obstacle or immoveable object, either on or running into the wall, that would remain in the same position in the new design. These may include :
- Central heating boiler
- Steps
- Ceiling beams
- Radiators
- Pipework (that cannot be moved)
- Extractor fans
- Water stopcock tap
- Gas, electricity, and water meters
- Electricity consumer units
- Sloping ceiling
- Ceiling bulkhead/lowered section of ceiling
- Dining room hatch
- Waste/drain outlets
- Gas or electricity supply for cookers, ovens, etc
- You can include switches, sockets, and sections of plumbing/pipework
Use a separate paper plan for each wall and record all measurements in millimetres (mm).
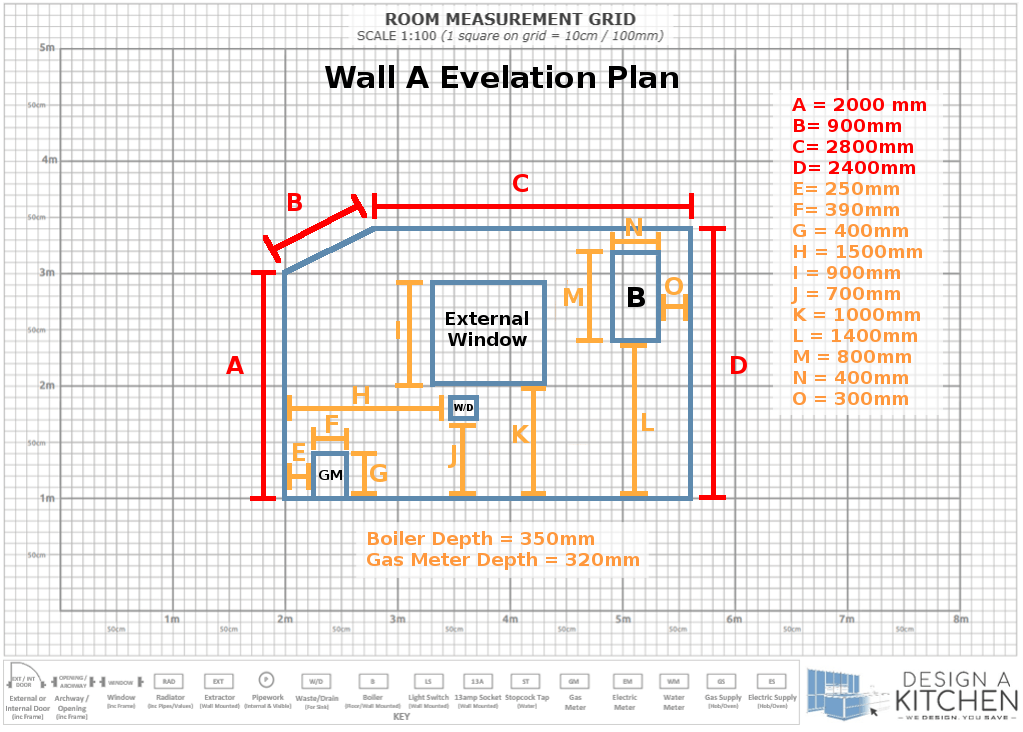
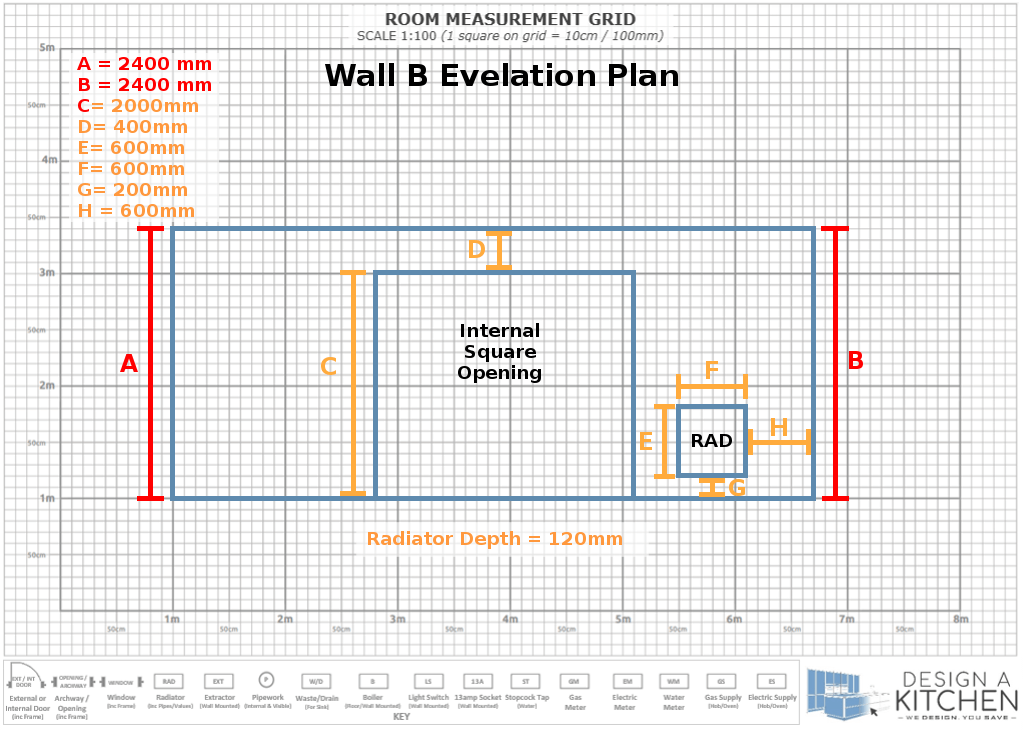
Start by writing a title on the paper plan to reference the wall from the room outline plan, for example, ‘Wall A Plan’.
Then measure the ceiling height at both ends of the wall. Using these measurements, plus those on the room outline plan, draw the outline of the wall on the paper plan.
For each door, window, archway & wall opening, measure the vertical height and include any frame or architrave surround in your measurement. Then, if applicable, measure the vertical distance from the floor to the bottom of the opening or any frame or architrave surround. Using these measurements plus those on the room outline plan, draw the outline of each opening on the paper plan.
For obstacles and immovable objects, measure their height, width & depth (i.e. from the wall to the front of the object) along with the distance from the floor and adjoining walls. Using these measurements draw the outline of each object on the paper plan.
Using these measurements update the paper plan to accurately position each opening and obstacle/immovable object on the paper wall. Add a unique label for each measurement taken to the paper plan then create a ‘key’ to record the label and the associated measurement, as per the two examples pictures.
Step 4 – Check & Send
You are almost done!
Before you send us your plans, we recommend that you double check all measurements on your paper plans to ensure that they are accurate. Once you’ve checked your measurements and you are happy, scan or take photographs of your paper plans and email them, along with photographs of your room showing each wall and each obstacle/immovable, to mydesigner@designakitchen.co.uk.
That’s it! When our designer has reviewed your plans & photographs they will contact you to capture your requirements and discuss design options for your new kitchen.
Note
Please ensure that scanned images and/or photographs are in focus and that all measurements on the paper plans are legible before emailing them to us.
Got a question?
If you have any questions or need any assistance don’t hesitate to contact us by sending us an email on enquiries@designakitchen.co.uk or calling us on 0330 1333797.


